One day while browsing on the websites we are maintaining, I saw that FB Page Plugin only shows half. So there must be something that is causing it. In my investigation, it turns out that Simple Share Buttons Adder is the culprit.
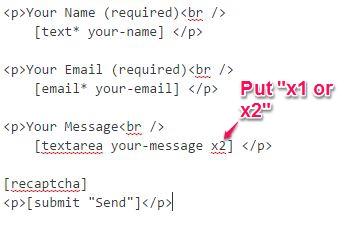
Resizing text area (message area) of Contact Form 7 can be managed in 2 ways. If your only problem is how to fit the size when you put contact form in the footer, just add “x1” or “x2” to make the message text area to be 1 liner or 2.
The other solution is to get your hands dirty by customizing the CSS form. There are several ways to implement this, depending on your theme. But here’s the most common implementation:
/*added to widen contact form 7 text field*/
textarea {
height: 250px;
width: 500px;
}
Again, there are still some other ways to do it. Other coder uses class or id to implement this. Do you have any problem with your Contact Fomr 7? Post a message below or send us a question.
In this post, I will discuss 7 reasons why use Divi for your next WordPress Project. For over 8 years of experience of setting up WordPress sites, using a premium theme is my most recommended way of starting your project. You can lose a lot of your precious time in the process without achieving much if you experiment on various themes available for free.
While there is nothing
wrong in using free themes, in fact there are lots of good free themes that you
can check out there, but the chance of getting the best features that you are
looking for a theme is not there or at still lacking.
So why use Divi Theme?
1. Divi is Drag and Drop kind of theme. While there is no such thing as “zero coding” in WordPress setup, Divi greatly reduces the probability of using the code. It’s so feature rich in a sense that you can design almost any kind of WordPress with the least manual coding.
2. Divi is easy to learn. I have seen similar kind of themes out there, but Divi has full tutorials and is a way easy to learn. I can also say that it is one of the most polished drag and drop themes out there, if not the best.
3. Divi has a lot of “premade” layouts in it. This makes designing a lot easier than before. All you have to do is to do some clicks and upload the layout and then customize it the way you want it.
4. Divi has a front end, editing feature. You are able to edit and see at the same time what you are editing.
5. Divi is a good way to start learning WordPress. Some people will probably not agree with me on this matter. However, if you are looking for ahead start in WordPress, Divi is more fun to deal with in designing your first website.
6. Divi a designers dream theme for license. You can have a business without worrying for license. Once you purchased a lifetime license, all the sites that you built is covered with the updates even if the site is your client’s site.
7. Divi has all the tutorials you need. Elegant themes has a ton of tutorials about Divi and it is uploaded also in Youtube. Nearly all your questions will be answered buy just watching the tutorials.
So there you have it. Hope
this list of reasons will give you a bigger picture of why I did used Divi in
most of my projects lately.
If you are using an Optimize Press plugin, then you might have encountered this notification error:
Notice: Use of undefined constant OP_SN - assumed 'OP_SN' in
... /wp-content/plugins/optimizePressPlugin/lib/framework.php on line 494

Notice: Use of undefined constant OP_SN - assumed 'OP_SN' in
... /wp-content/plugins/optimizePressPlugin/lib/framework.php on line 495
This happens if you your WordPress wp-config.php file debug is set to True. I first noticed this notification when my websites upgraded to 4.0 version, and it was very annoying to have this error appearing in the front end of your website.
The solution though is very simple. Just login to your cpanel, locat wp-config.php and look for this line:
define( 'WP_DEBUG', true );
Simply change the “true” to “false”, then click save. That should take out that error line.
One of the best things that you can get with Studiopress’ Genesis Framework is its flexibility to add new widget area. This kind of flexibility has become a lot easier compared few years ago when Genesis Framework is just starting up. There are some other ways in adding new widget areas if you are using other themes but unlike Genesis, they often use another set of plugin.
In Genesis however, we don’t have to add another plugin. All we need to do is to add a few codes. The first code that we need to add in functions.php of your child theme is this:
This code will register a new widget. Please take note of the following labels:
id = You will have to remember this one because this will be your call id.
name = This is the name that widget.
description = You need this so that you will be able to identify where your code is located.
The second code that you will have to install is where you will want the widgetized area to appear. You will have to be familiar with Genesis hooks location so that you will be able to identify the right call sign. So if you are not familiar with the Genesis hooks, no problem. Just refer in this Genesis visual hook guide. The code is:
Please take note that “genesis_before_footer” is the hook. And you can refer to other hooks in the visual hook guide where you want it to appear. In this example, I prefer that it will appear before the the footer.
Now, the third code that we will have to know is the CSS. Please take note of the “id”
Again, if you are familiar with CSS styling, this will be far more useful to you. The above CSS is what I have used for this example. Feel free to modify it if you want.
Have you ever used Genesis? Share your thoughts below.